


Three-Dimensional Expansion Microscopy Kit (4x 3D-ExM)

Three-Dimensional Expansion Microscopy Kit (4x 3D-ExM)
- Enables approximately four-fold three-dimensional expansion of cells
- All-in-one reagents for gel preparation and sample expansion
- Allows imaging of fine cellular microstructures with a confocal microscope
-
Product codeT517 Three-Dimensional Expansion Microscopy Kit (4x 3D-ExM)
| Unit size | Price | Item Code |
|---|---|---|
| 10 tests | Find your distributors | T517-10 |
[Notes ]
- For more detailed observation, the use of an water-immersion lens is recommended. Please refer to the FAQ: “What should I be careful about regarding microscopes/lenses during observation?”
- Cell staining reagents (such as nuclear stains) are not included in the kit.
| 10 tests | ・Monomer Solution ・Polymerization Initiator ・Polymerization Promoter ・Activation Buffer ・Enzyme Solution ・Crosslinking Solution ・Mold ・Cover Glass |
3 ml×1 30 mg×1 250 µl×1 3 ml×1 100 µl×1 100 µl×1 ×10 ×10 |
|---|
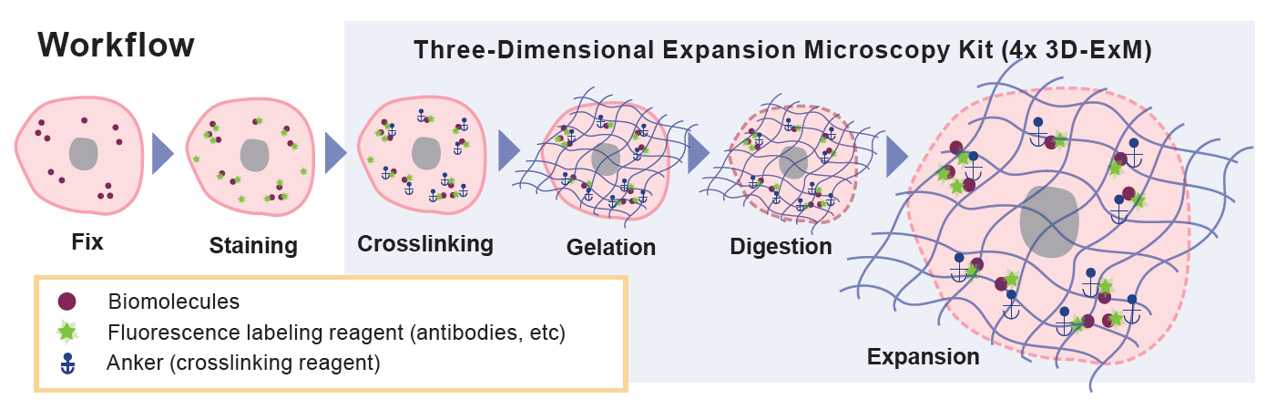
How Expansion Microscopy (ExM) works
Multiple organelles exist within cells, and analyzing the structure of each is essential for understanding cellular function and elucidating disease mechanisms. High‑resolution imaging of intracellular organelles typically requires expensive equipment such as electron microscopes or super‑resolution microscopes.In contrast, because of the Abbe diffraction limit, detailed analysis of organelle structures using a conventional confocal microscope is difficult. To overcome this limitation, Expansion Microscopy (ExM) was developed in 2015 as one of the methods for observing organelles with fluorescence microscopy. ExM is a technique that enlarges the physical size of the sample itself by embedding it in a swellable hydrogel, enabling confocal microscopes to image fine structures that were previously unresolvable.
This kit contains all reagents and mold required for gel preparation in the Expansion Microscopy process and enables approximately four‑fold three‑dimensional expansion of cells.
References:
F. Chen, P. W. Tillberg, Science, 2015, 347(6221): 543–548.
R. Norman, et al., Journal of Cell Biology, 2025, 224(2): e202407116.
This product is covered by U.S. Patent Application No. 17/466,434.
This technology is based on research conducted by Dr. Aussie Suzuki at the University of Wisconsin–Madison.
Manual
Operation 7: Move the cover glass into the circle of the mold.
Operation 16: Remove the mold and place the gel into a 10‑cm dish.
Operation 19: Carefully remove the ultrapure water without damaging the gel.
Technical info
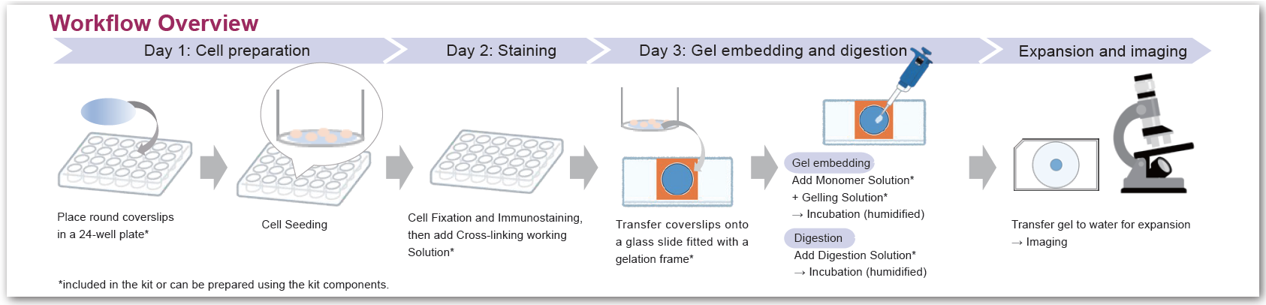
The 4x 3D-ExMD kit includes all the reagents required for the experiment. Protocols and video tutorials, guiding users from cell preparation to gel embedding and imaging, have been prepared for beginners.
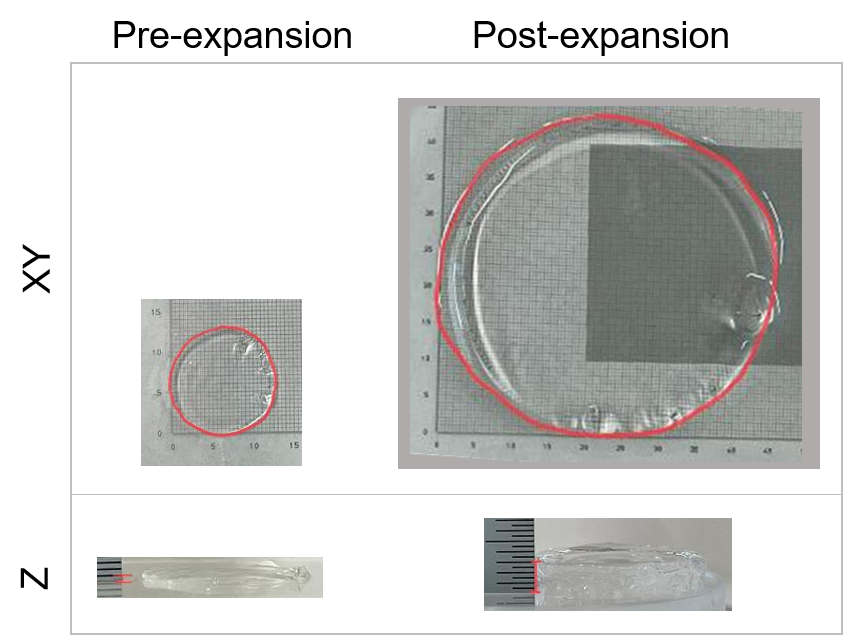
Able to expand cells by roughly ~4× in 3D
We stained the nuclei of HeLa cells—which can be expanded approximately fourfold in three dimensions—with DAPI and performed imaging using expansion microscopy with this kit.
Using the gel size and the DAPI‑stained nuclei as expansion indicators, we confirmed that the sample expanded approximately fourfold along each of the X, Y, and Z axes.
Gel size
Nuclear staining
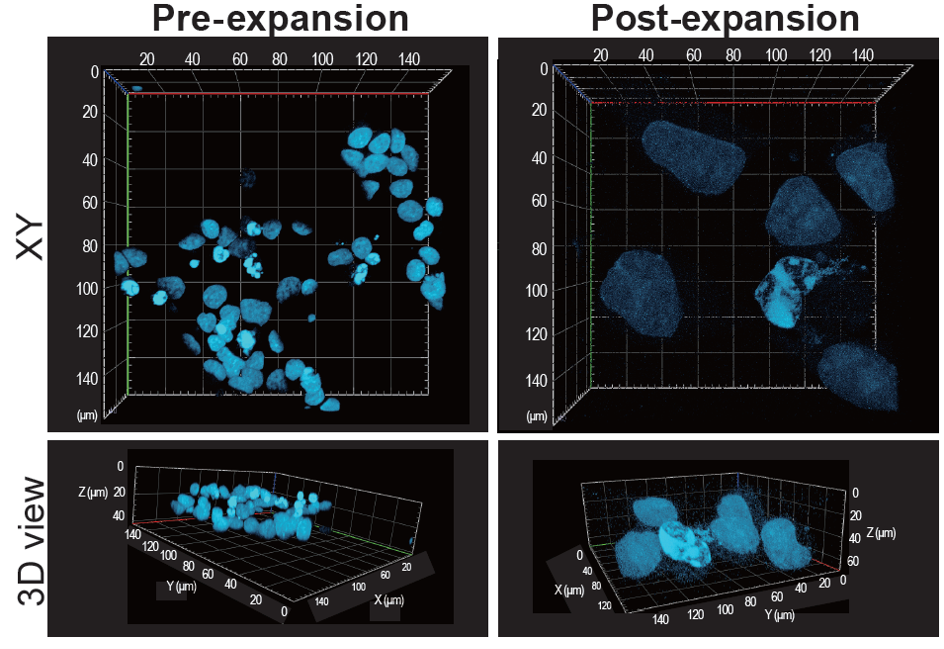
<Imaging conditions>
Confocal laser microscope, 40× water‑immersion objective
DAPI (blue): Ex/Em = 405 / 420–480 nm
Pre-expansion: Laser 1.0%, Gain 550 V
Post-expansion: Laser 2.5%, Gain 680 V
Evaluation of Resolution and Size Changes Before and After Expansion
After staining the nuclei of RPE1 cells with DAPI, the cells were expanded using this kit and imaged with a confocal microscope equipped with a 20× water‑immersion objective.
Comparison of the same cells before expansion (Pre‑3D‑ExM) and after expansion (Post‑3D‑ExM) revealed that the expanded cells exhibited improved resolution, and that the lengths of both the major and minor axes, as well as the cell area, increased by approximately fourfold.
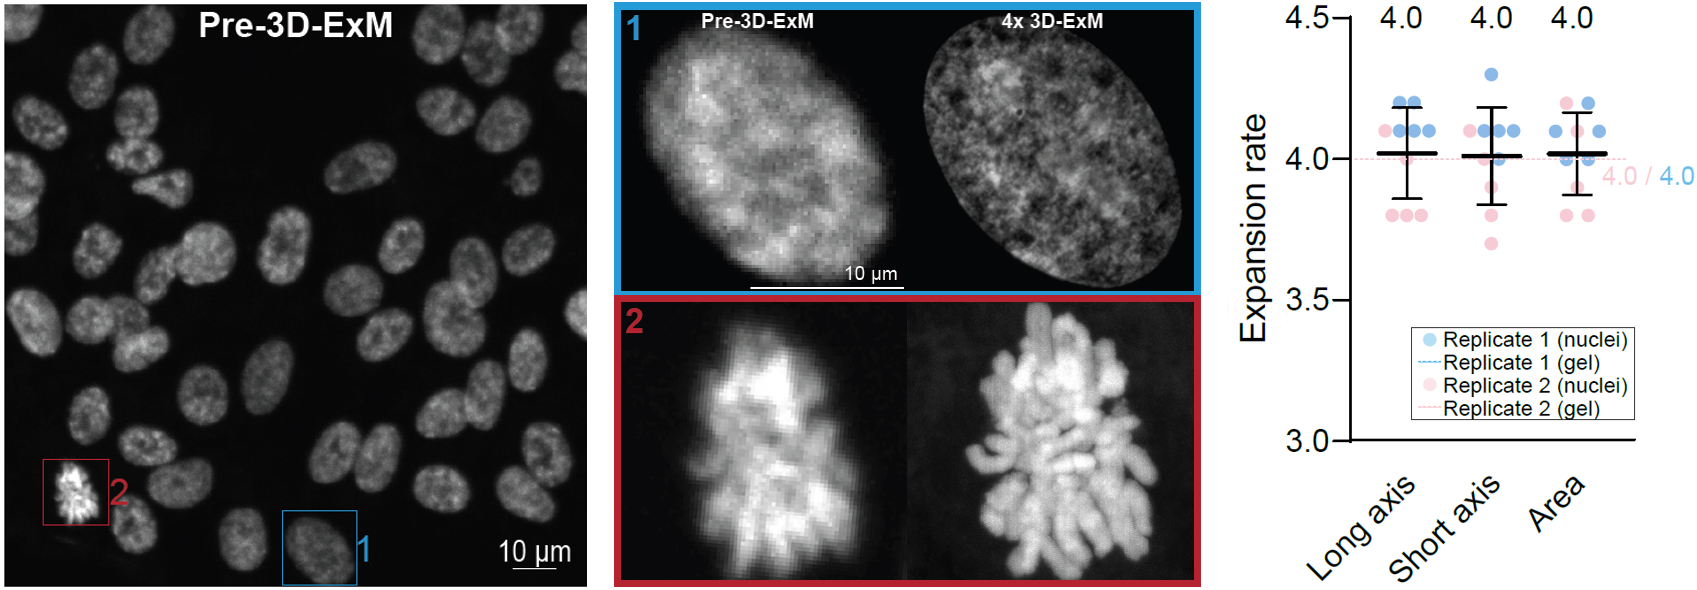
※The blue box (1, upper panel) and the red box (2, lower panel) illustrate examples of resolution changes in two cellular regions of the same cell before and after expansion.
<Experimental Conditions>
Cells:RPE1 (hTERT-immortalized retinal pigment epithelial cells)
Staining: DAPI, 30 min
<Imaging Conditions>
Microscope system: Spinning-disk confocal (Yokogawa CSU + Nikon Ti2 stand + CMOS camera)
Lens: A 20× water-immersion objective was used for both pre- and post-ExM imaging (the same cell was imaged with identical optical settings).
405 laser: 60% power with 200 msec exposure for ExM
Experimental data:Kindly provided by Dr. Aussie Suzuki, University of Wisconsin–Madison.
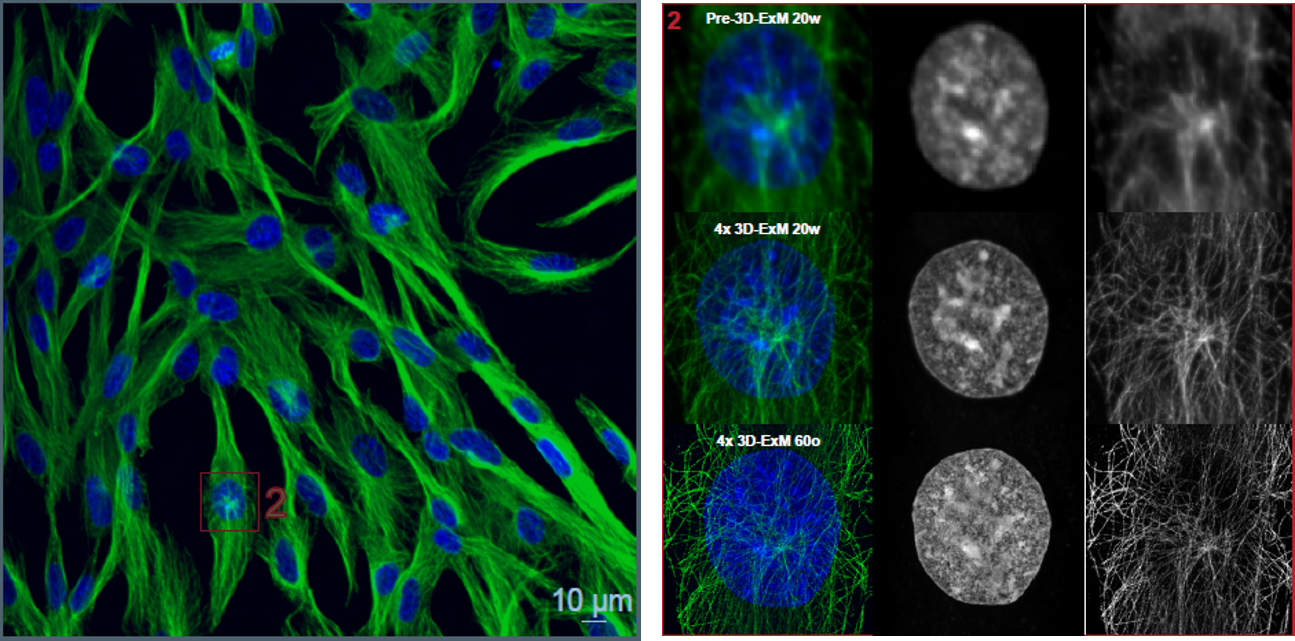
Observation of the Nucleus and Tubulin After Expansion
After staining the nuclei and tubulin of RPE1 cells, the cells were expanded using this kit. The samples were then imaged with a confocal microscope using a 20× water‑immersion objective, followed by imaging of the same cells with a 60× oil‑immersion objective. As a result, detailed morphologies of the nucleus and cytoskeleton were successfully visualized.
<Experimental Conditions>
Cells: RPE1 (hTERT-immortalized retinal pigment epithelial cells)
Staining
Primary antibody: anti-alpha-Tubulin (DM1A), 1 hour
Secondary antibody: Alexa488 conjugated anti-mouse-IgG, 1 hour
DAPI, 30 min
<Imaging Conditions>
Microscope system: Spinning-disk confocal (Yokogawa CSU + Nikon Ti2 stand + CMOS camera)
Imaging conditions: A 20× water-immersion objective was used for both pre- and post-ExM imaging (the same cell was imaged with identical optical settings). The same cell was also imaged using a 60× oil-immersion objective to obtain higher-resolution images.
405 laser: 60% power with 200 msec exposure for ExM
488 laser: 60% power with 200 msec exposure for ExM
Experimental data:Kindly provided by Dr. Aussie Suzuki, University of Wisconsin–Madison.
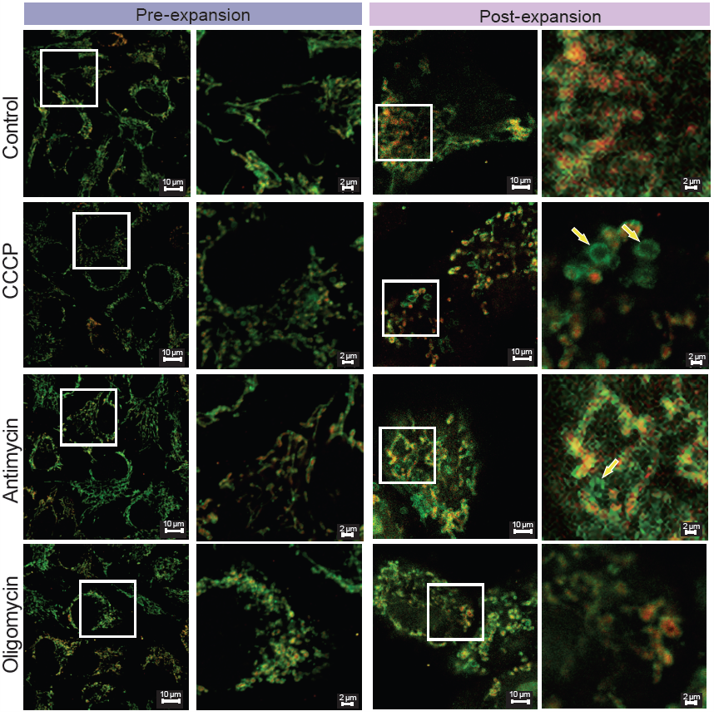
Example Experiment: Observation of Mitochondrial Morphological Changes Induced by Different Drug Treatments
Experiment: HeLa cells were treated with CCCP*, antimycin*, or oligomycin**, immunostained for TOM20 (outer membrane) and COX IV (innermembrane), and analyzed by expansion microscopy using this kit.
Results: Before expansion, mitochondrial fission was observed, but discrimination between the outer and inner membranes was difficult. After expansion, CCCP- and antimycin-treated cells showed ring-shaped outer membrane structures lacking COX IV signal (yellow arrows), whereas COX IV was retained within divided mitochondria in oligomycin-treated cells. This kit enables visualization of inner membrane changes during mitochondrial fission.
*CCCP and antimycin: depolarizing agents
**Oligomycin: non-depolarizing
<Experimental Conditions>
CCCP : 10 μmol/l, 30 min
Antimycin: 10 μmol/l, 30 min
Oligomycin: 10 μmol/l, 30 min
<Imaging Conditions>
Lens: 63× Oil objective
Confocal microscopy (Zeiss LSM800)
TOM20 (green): Ex/Em = 488/500-550 nm
COX IV (red): Ex/Em = 561/580-620 nm
Pre-expansion
TOM20: Laser 1.0 %, Gain 650 V
COX IV: Laser 2.0 %, Gain 650 V
Post-expansion
TOM20: Laser 70 %, Gain 700 V
COX IV: Laser 70 %, Gain 750 V
Q & A
-
Q
What should I be careful about regarding microscopes/lenses during observation?
-
A
Since the sample becomes thicker after expansion, we recommend using a water-immersion objective lens to facilitate easier observation of deeper regions.
If you use an oil‑immersion objective lens, please note the following:
- Oil‑immersion lenses have a short working distance (the distance between the lens and the sample), so in some cases the lens may touch the observation chamber before reaching focus.
- If this occurs, please section the gel during observation and continue imaging.
For more details, please refer to the imaging manual.
-
Q
Can it be observed using an fluorescence microscope?
-
A
Observations with an fluorescence microscope are not possible.
After expansion, the sample becomes thicker, which increases out‑of‑focus light when using an fluorescence microscope. As a result, the background signal becomes higher and making it difficult to resolve fine structural details. Therefore, we recommend using a confocal microscope for imaging.Please also refer to the FAQ: “What should I be careful about regarding microscopes/lenses during observation?”
-
Q
Please tell me the precautions regarding staining reagents when staining cells.
-
A
・Cyanine dyes in the red to near-infrared range cannot be used because they undergo degradation during the gelation reaction.
Examples: Alexa Fluor® 647, Alexa Fluor® 660・The following dyes have been successfully used:
Alexa Fluor® 488, Alexa Fluor® 568, DAPI
-
Q
How stable is the sample after expansion? Is it possible to store it for several days before observation?
-
A
If the gel remains hydrated, we have confirmed it can be stored at room temperature for up to 7 days while remaining suitable for imaging.
Please be sure to use sterile water during storage to prevent microbial growth.Note that refrigeration or freezing causes the gel to shrink, making imaging impossible.
-
Q
I would like to observe the cells before expansion. Could you tell me the appropriate timing and method for the observation?
-
A
Please observe the cells after staining them (i.e., after Step 3 of the instruction manual and before adding the cross‑linking solution).
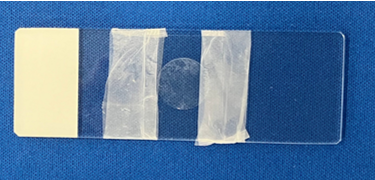
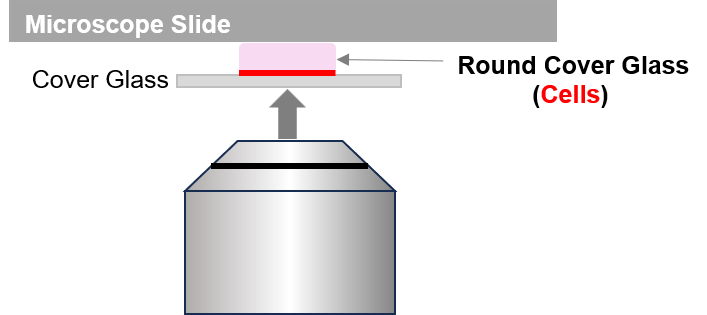
Observation after adding the Cross‑linking solution is not recommended, as the autofluorescence of the reagent can interfere with imaging.For observation, place the round coverslip containing the seeded cells onto a microscope slide, cover it with another coverslip, and seal the edges with paraffin or a similar material to prevent movement. This will facilitate stable imaging.
When using a confocal microscope, position the sample so that the cell side faces downward during imaging.
*Preparation of the Slide for Observation and Imaging
-
Q
Can the cells be stained after expansion?
-
A
If the fluorescence appears dim during post‑expansion imaging, additional staining may be performed.
Please refer to the supplementary notes in the instruction manual under [Step 24: Fluorescence Observation].
-
Q
Can this kit be used for tissue samples?
-
A
It cannot be used for tissue samples.
-
Q
[Troubleshooting: Imaging] The target structure cannot be located.
-
A
First, search for the nuclei using the wavelength of the nuclear stain, and then switch to the wavelength appropriate for your target.
At that time, widen the pinhole of the confocal microscope and detect over a broad range in the Z‑direction.
If the target is still not found, increase the laser power or gain.For further details, please refer to the imaging manual.
-
Q
[Troubleshooting: Imaging] Fluorescence is too weak to visualize the sample.
-
A
Because the sample expands 4-fold along the X, Y, and Z axes, fluorescence intensity becomes significantly lower compared with the pre-expansion state.
1. Increase the Laser Power and Gain of the microscope beyond typical settings.
Example (using an oil-immersion objective on a Zeiss LSM800):- Before expansion: Laser 1–2%, Gain 550–650 V
- After expansion: Laser 20–80%, Gain 700–800 V
2. If the fluorescence is still weak after step 1, perform additional staining.
(Refer to the supplementary notes in the instruction manual under [Step 24: Fluorescence Observation].)-
If nuclear staining is weak:
Stain with 10 µg/mL DAPI in water for 30 min at room temperature. -
If immunofluorescence is weak:
Perform additional secondary antibody staining.
-
Q
[Troubleshooting: Imaging] The gel moves and imaging cannot be performed.
-
A
If water remains between the imaging chamber and the gel, the gel may slip and shift.
Therefore, wipe away excess moisture with a Kimwipe or similar material as needed.
If a large amount of water is present, remove it using an aspirator or a micropipette, taking care not to aspirate or damage the gel.
(Video: https://www.youtube.com/embed/959AFnx8HHw)Additionally, placing a Kimwipe or similar material between the imaging chamber and the gel to increase friction is also effective for preventing movement during imaging.
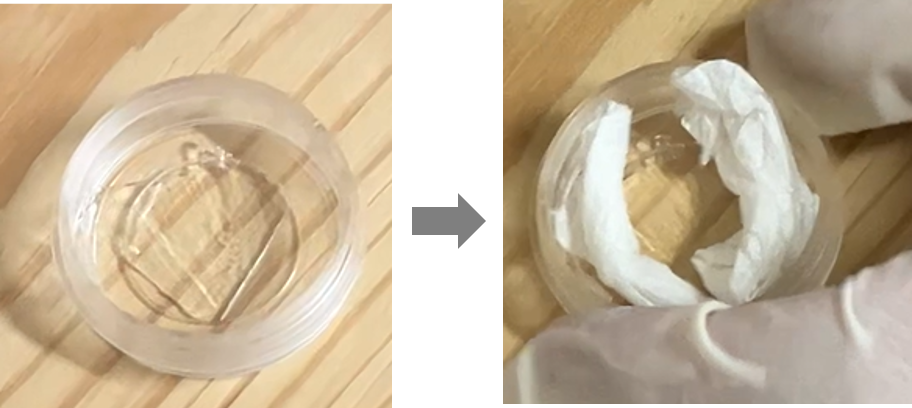
To prevent the gel from shifting, insert Kimwipes around its perimeter.
Handling and storage condition
| 0-5°C | |
|
Danger / harmful symbol mark |
    
|
|---|---|


