

Sample Preparation
|
|---|
-
- 1. Cut the expanded gel to fit the imaging chamber using a razor blade, scalpel, or a similar tool.
- ※For example, when using a 35‑mm dish, dividing the gel (approximately 40 mm in diameter) into four pieces allows up to four imaging sessions from a single gel.
- 2. Transfer the cut gel using a spatula, taking care not to damage it.
- ※Using a micro-spatula with a slightly bent tip on the handle can make handling easier.
- Example: When using a 35‑mm dish as the imaging chamber and dividing the gel into four equal parts
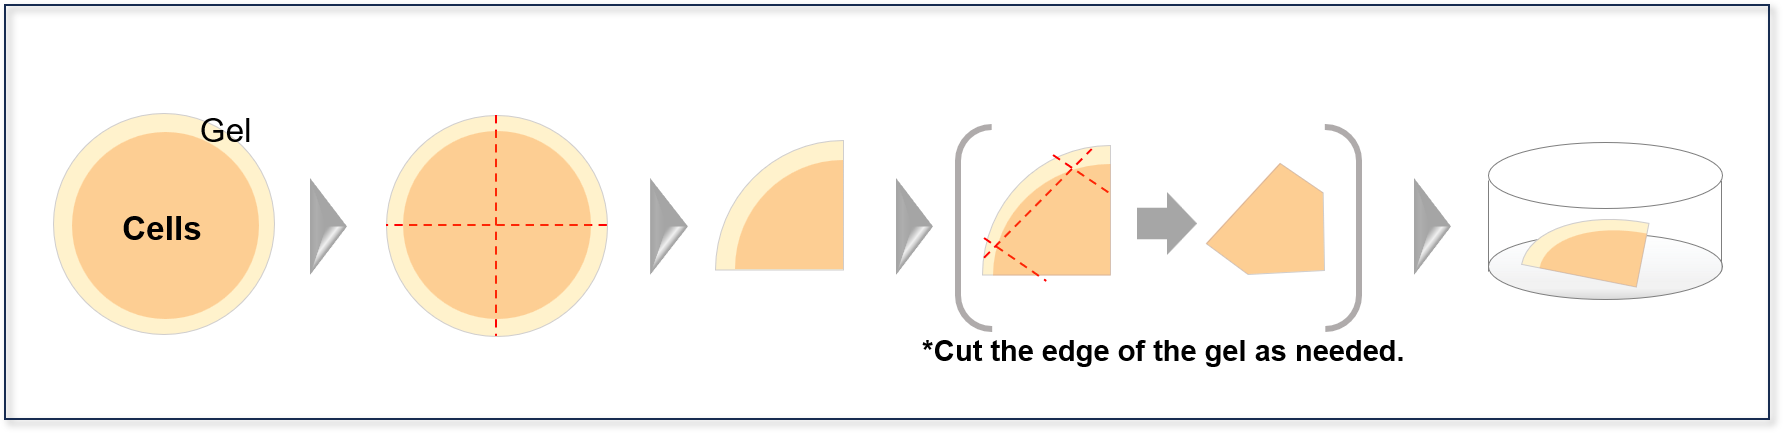
- *When using an oil‑immersion objective, you may need to slice the gel. Handling becomes easier if the gel is pre‑trimmed to a smaller size.
-
Cut the expanded gel
Imaging Workflow
|
|---|
-
- 1. Using low magnification (10×) and a digital zoom (0.5×), locate the nuclei from the bottommost plane using the 405‑nm laser for DAPI.
※ Because fluorescence becomes weaker compared to the pre‑expansion state, increase the gain during imaging. Example: Using an oil‑immersion objective on a Zeiss LSM800. Pre-expansion: Laser 1–2%, Gain 550–650 V; Post-expansion: Laser 20–80%, Gain 700–800 V.
- 2. Once the nuclei are located, reset the digital zoom to the normal setting (1.0×) and confirm that the nuclei appear enlarged.
- 3. Switch to a higher magnification (20× or higher) and locate the nuclei again (this step is essential because changing magnification causes a shift along the Z‑axis).
While visually confirming the distance between the objective lens and the imaging chamber, gradually increase the magnification (e.g., from 1× to 10×)
If the objective does not contact the imaging chamber even at higher magnification, proceed as is.
※ If the objective lens comes into contact with the imaging chamber, refer to “③ Supplement: When the lens contacts the imaging chamber.”
- 4. Once the nuclei are located, switch to the laser appropriate for the target structure and search along the Z‑axis near the identified nuclei.
※ If the target structure cannot be located, refer to “③ Supplement: When the target cannot be found.”
- 5. Perform imaging.
※ If the gel moves and imaging cannot be performed, refer to “③ Supplement: When the gel moves and imaging cannot be performed.”
- 1. Using low magnification (10×) and a digital zoom (0.5×), locate the nuclei from the bottommost plane using the 405‑nm laser for DAPI.
Supplement
|
|---|
-
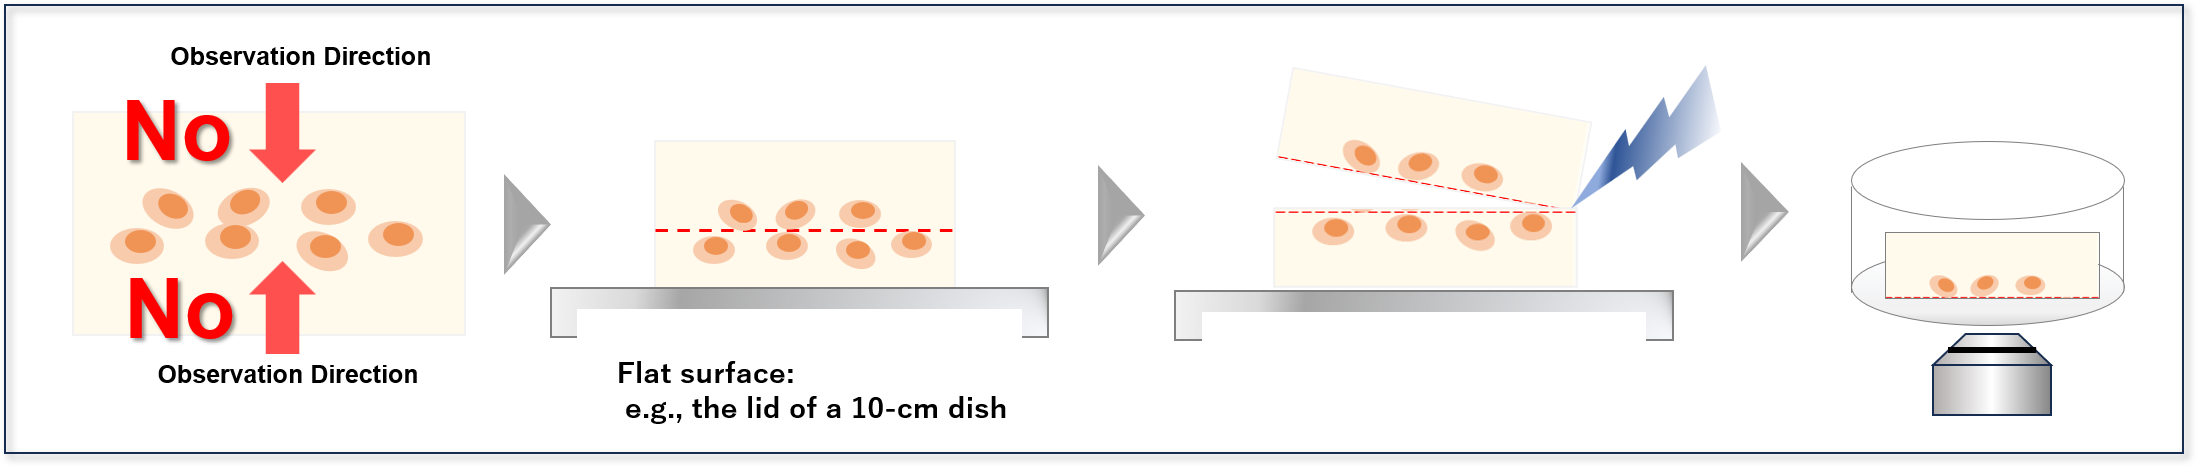
When the lens contacts the imaging chamber:
- 1. Flip the gel carefully
- ・Carefully flip the gel within the imaging chamber using a spatula or a similar tool.
- ・Take care not to tear or damage the gel during this process.
-
Examples of cases where cells in the gel cannot be imaged due to their position, and corresponding countermeas
-
- 2. Slice the gel in half (if the gel still contacts the imaging chamber after Step 1)
- ・Transfer the gel from the imaging chamber onto a separate flat surface, and slice it near the center using a razor blade, scalpel, or similar tool.
- ・Place the sliced gel back into the imaging chamber with the cut surface facing downward, and then perform imaging.
- Case: Cells are located near the center of the gel and cannot be imaged even after flipping — how to resolve it
- When the target cannot be found:
- 1. Increase the microscope's laser power and gain during imaging.
- ※Example (using an oil‑immersion objective on a Zeiss LSM800): Pre-expansion: Laser 1–2%, Gain 550–650 V /Post-expansion: Laser 20–80%, Gain 700–800 V
- 2. Perform additional staining (if the target still cannot be observed even after increasing the laser power and gain in Step 1).
- ※For details on the post‑staining procedure, please refer to the supplementary notes under [Step 24: Fluorescence Observation] in the instruction manual.
- When the gel moves and imaging cannot be performed
- ・If water remains between the imaging chamber and the gel, the gel may slip. Wipe off excess moisture with a Kimwipe or similar material before imaging as needed .
- ・If a significant amount of water is present, remove it using an aspirator or a micropipette, taking care not to aspirate or damage the gel.
- ※You may also place a Kimwipe or similar material between the imaging chamber and the gel to increase friction and reduce gel movement during imaging.
-
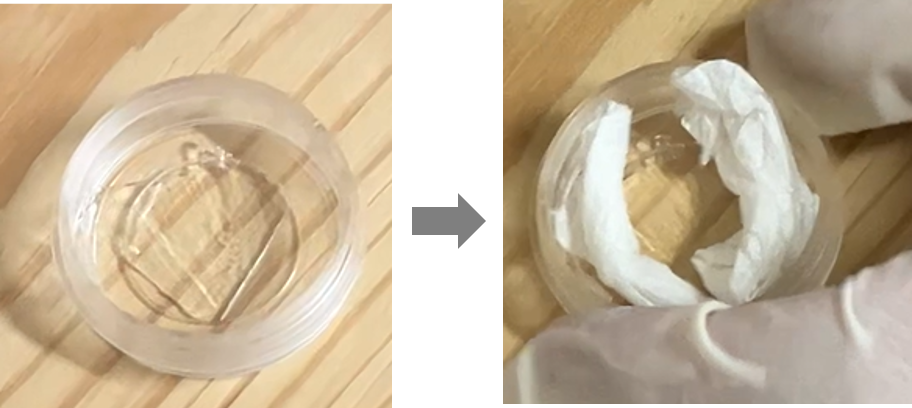
To prevent the gel from shifting, place Kimwipes around its perimeter.
- 1.Flip the gel
-
- 2.Slice the gel in half
