 Hidden sections will not be printed.
General Information
Mitochondria are one of the most important organelles in aerobic organisms, responsible for producing ATP, the cell's energy source. Beyond energy production, they are also involved in lipid and amino acid metabolism, calcium regulation, and redox control. Mitochondrial dysfunction is known to cause numerous diseases, including cancer, aging, neurodegenerative diseases such as Alzheimer's disease, and mitochondrial disorders. For mitochondrial function assessment, fractionated mitochondria are used to avoid interference from other organelles. In recent years, detailed functional analysis using fractionated mitochondria has become increasingly active.
The IntactMito Fractionation Kit for Tissue enables the fractionation of intact mitochondria from tissue. This kit includes all reagents, buffers, and centrifuge tubes required for mitochondrial fractionation.
Kit Contents
10 tests
| Homogenization Buffer | 50 ml x 1 |
| Resuspension Buffer | 15 ml x 1 |
| Stabilization Buffer | 15 ml x 1 |
| Reagent A | 150 g x 2 |
| Reagent B | 5 g x 1 |
| Centrifuge Tube | 30 tubes (three tubes used per test) |
Storage Conditions
Store at 0-5 oC
Required Equipment and Materials
- Refrigerated centrifuge (compatible with 50 mL tubes and capable of 7,200 × g)
- Potter-type 20 ml homogenizer (materials: outer tube – glass; pestle – PTFE; support rod – stainless steel)
Table 1 Other homogenizers that we have testedCapacity Materials Outer tube Pestle Support rod 5 ml Glass PTFE Stainless steel 10 ml Glass PTFE Stainless steel 30 ml Glass PTFE Stainless steel Glass Glass Glass - Scissors (for organ excision and mincing)
- Forceps (for organ excision)
- Beaker
- Ice box
- Cotton wool
- Two glass rods
- 1000-5000 µl, 20-200 µl micropipettes
Precautions
- Equilibrate the reagents to room temperature prior to use.
- Set the refrigerated centrifuge to 4 oC before use.
- Remove Ca²⁺ and other ions from the experimental apparatus. There is a step in the kit protocol in which the vessels used (beakers, Centrifuge Tubes, and the homogenizer) are filled with buffer solution, which is then discarded.
- Prevent contamination by Ca²⁺ and other ions during the procedure. Make sure that no ice enters the experimental apparatus.
Preparation of Solutions
- Prepare the required amount of each buffer solution according to the number of tests.
Homogenization buffer solution: 400 ml/test
Resuspension buffer solution: 30 ml/test
Stabilization buffer solution: 30 ml/test
Preparation of Homogenization buffer solution
- Weigh the required amount of Reagent A as specified in Table 2.
- Add ultrapure water to approximately 50% of the final preparation volume, and dissolve Reagent A using a magnetic stirrer or an ultrasonic bath.
- Add the required amount of Homogenization Buffer as specified in Table 2.
- Add ultrapure water to bring the total volume up to the final preparation volume.
- Weigh the required amount of Reagent B.
- Add the weighed Reagent B (from step 5) to the solution prepared in step 4, and dissolve it using a magnetic stirrer or an ultrasonic bath.
- After adding Reagent B, the solution tends to foam easily. Handle with care to avoid excessive foaming.
Table 2 Preparation example of the Homogenization buffer solution
| 400 ml/test | |
| Reagent A | 21.86 g |
| Homogenization Buffer | 4.40 ml |
| Reagent B | 0.40 g |
Preparation of Resuspension buffer solution
- Weigh the required amount of Reagent A as specified in Table 3.
- Add ultrapure water to approximately 50% of the final preparation volume, and dissolve Reagent A using a magnetic stirrer or an ultrasonic bath.
- Add the required amount of Resuspension Buffer as specified in Table 3.
- Add ultrapure water to bring the total volume up to the final preparation volume.
- Weigh the required amount of Reagent B.
- Add the weighed Reagent B (from step 5) to the solution prepared in step 4, and dissolve it using a magnetic stirrer or an ultrasonic bath.
- After adding Reagent B, the solution tends to foam easily. Handle with care to avoid excessive foaming.
Table 3 Preparation example of the Resuspension buffer solution
| 30 ml/test | |
| Reagent A | 1.64 g |
| Resuspension Buffer (White cap) | 1.23 ml |
| Reagent B | 0.03 g |
Preparation of Stabilization buffer solution
- Weigh the required amount of Reagent A as specified in Table 4.
- Add ultrapure water to approximately 50% of the final preparation volume, and dissolve Reagent A using a magnetic stirrer or an ultrasonic bath.
- Add the required amount of Stabilization Buffer as specified in Table 4.
- Add ultrapure water to bring the total volume up to the final preparation volume.
- Weigh the required amount of Reagent B.
- Add the weighed Reagent B (from step 5) to the solution prepared in step 4, and dissolve it using a magnetic stirrer or an ultrasonic bath.
- After adding Reagent B, the solution tends to foam easily. Handle with care to avoid excessive foaming.
Table 4 Preparation example of the Stabilization buffer solution
| 30 ml/test | |
| Reagent A | 1.64 g |
| Stabilization Buffer (Red cap) | 1.20 ml |
| Reagent B | 0.03 g |
General Protocol
-Pre-preparation before organ excision-
- Set the refrigerated centrifuge to 4 oC.
- Prepare an ice bath.
- Add the Homogenization buffer solution to the apparatus, as follows:
・Approximately 20 ml in a beaker (for the extracted organs);
・Approximately 80% of the volume in Centrifuge Tubes (three tubes per test);
・Approximately 80% of the volume in the homogenizer (outer tube, pestle, and support rod).
Place all in the ice bath. - Cut a cotton wool (two pieces per test), roll each piece into a ball approximately 1-1.5 cm in diameter, transfer to a beaker or similar container, and add approximately 20 ml of Homogenization buffer solution.
- Discard the Homogenization buffer solution from step 4, add approximately 20 ml of the Resuspension buffer solution, and place it in the ice bath.
- The remaining Homogenization and Stabilization buffer solutions will be used during the mitochondrial fractionation experiment. Store them in the ice bath until use.
-Mitochondrial fractionation experiment-
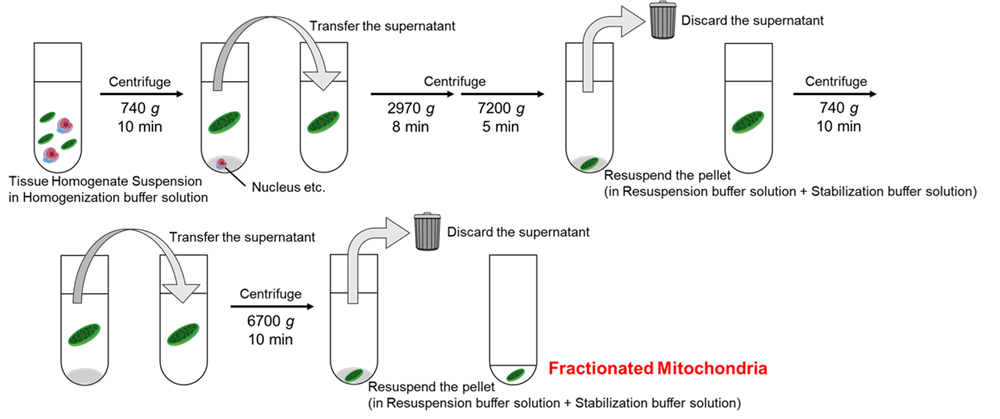 |
|
Figure 1 Centrifugation procedure |
- For detailed experimental procedures, see the General Protocol.
- All operations must be performed in an ice bath.
- Immerse the organs extracted from the mouse in the beaker prepared in Pre-preparation step 3.
- Mince the tissue into small pieces (approximately ≤1 mm) using scissors, replacing the Homogenization buffer solution as needed.
- Repeat until the buffer solution becomes mostly clear.
Guideline: brain: 1-2 times; liver: 2-3 times.
- Repeat until the buffer solution becomes mostly clear.
- Discard the Homogenization buffer solution that filled the homogenizer prepared in Pre-preparation step 3, transfer the minced tissue from step 2 into the homogenizer, adjust the volume to the marked line by adding Homogenization buffer solution, and homogenize.
- Homogenize slowly by moving the pestle up and down approximately 10 times until no large tissue fragments are visible.
- If processing multiple samples, wash the used homogenizer (outer tube, pestle, and support rod) with detergent. Add the Homogenization buffer solution to approximately 80% of the homogenizer volume and place it in the ice bath to prepare for the following sample.
- Discard the Homogenization buffer solution from the first Centrifuge Tube prepared in Pre-preparation step 3. Transfer the homogenate obtained in step 3 into the Centrifuge Tube, place it in the refrigerated centrifuge, and centrifuge at 740 × g for 10 min at 4 oC.
- When using a 5 or 10 ml homogenizer in step 3:
After homogenization, the lysate (5 or 10 ml) should be transferred to a Centrifuge Tube, and Homogenization buffer solution added to bring the total volume to 20 ml. Centrifugation (as described in step 4) is then performed. - When using a 30 ml homogenizer in step 3:
After homogenization, the lysate (30 ml) should be transferred to a Centrifuge Tube, and the centrifugation (as described in step 4) is then performed with a total volume of 30 ml.
- When using a 5 or 10 ml homogenizer in step 3:
- Discard the Homogenization buffer solution in the second Centrifuge Tube prepared in Pre-preparation step 3, and transfer the supernatant obtained in step 4 into the Centrifuge Tube. Centrifuge at 2,970 × g for 8 min at 4 oC, then immediately continue centrifugation at 7,200 × g for 5 min at 4 oC without decreasing the centrifuge speed.
- Because the first and second centrifugation steps are continuous, the 2,970 × g centrifugation should be set for slightly longer than required (e.g., 9 min). After 8 min, adjust the centrifuge speed to 7,200 × g for the next 5 min.
- Decant the supernatant, and add 10 ml of Stabilization buffer solution to the Centrifuge Tube.
- Using the two glass rods, grasp a piece of cotton wool prepared in Pre-preparation step 5, press it against the wall of a beaker, and squeeze out the Resuspension buffer solution.
- Using the two glass rods, grasp the cotton wool from step 7 and gently disperse the pellet obtained in step 6.
- Be careful not to touch the pellet directly with the glass rods while dispersing.
- Once the pellet is sufficiently dispersed into a suspension, grasp the cotton wool with the two glass rods, press it against the wall of the Centrifuge Tube, and squeeze out the suspension.
- Wash the two glass rods used with the Homogenization buffer solution.
- Place the suspension obtained in step 9 in the refrigerated centrifuge and centrifuge at 740 × g for 10 min at 4 oC.
- Discard the Homogenization buffer solution from the third Centrifuge Tube prepared in Pre-preparation step 3, transfer the supernatant obtained in step 10 into this Centrifuge Tube, and centrifuge at 6,700 × g for 10 min at 4 oC.
- Decant the supernatant, and add 100 µl of Stabilization buffer solution using a micropipette.
- Using the two glass rods, grasp the second piece of cotton wool prepared in Pre-preparation step 5, press it against the wall of a beaker, and squeeze out the Resuspension buffer solution.
- Using the two glass rods, grasp the cotton wool from step 13 and gently disperse the pellet obtained in step 12.
- Be careful not to touch the pellet directly with the glass rods while dispersing.
- Once the pellet is sufficiently dispersed into a suspension, grasp the cotton wool with the two glass rods, press it against the wall of the Centrifuge Tube, and squeeze out the suspension.
- Store the mitochondrial suspension obtained in the Centrifuge Tube in the ice bath until further use.
- Use the obtained suspension of fractionated mitochondria for the various experiments.
- Prepare any dilution or assay solutions for fractionated mitochondria using the Stabilization buffer solution.
Experimental Example
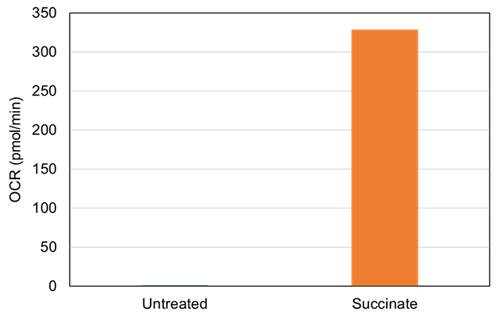
Changes in Oxygen Consumption Rate (OCR) of Brain-Derived Fractionated Mitochondria by Succinate
- The OCR measurements of mitochondria fractionated using this kit were performed according to the procedure described in the manual for our product “Extracellular OCR Plate Assay Kit” (code: E297), section “Procedure – Suspended Cells.” However, the working solution used for the OCR measurement was prepared with a Stabilization buffer solution rather than the medium.
- Fractionated mitochondria were suspended in Stabilization buffer solution (protein concentration: 0.5 mg/ml) as Blank 3, and fractionated mitochondria were suspended in working solution (protein concentration: 0.5 mg/ml) as Control and Sample. The mitochondria were added in 100 µl in a 96-well black clear-bottom microplate.
- Stabilization buffer solution (100 µl) was added to Blank 1, and working solution (100 µl) was added to Blank 2.
- Microplates were placed in a plate reader pre-set at 37 oC and incubated for 30 min.
- Stabilization buffer solution (10 µl) was added to each of Blank 1, Blank 2, Blank 3, and Control.
- A 110 mmol/l succinate solution diluted with Stabilization buffer solution was added to the sample in 10 µl portions (final concentration: 10 mmol/l).
- A 0.25 mol/l succinate solution adjusted to a pH of 7.2-7.6 with potassium hydroxide solution was used.
- One drop of Mineral Oil was added to each well immediately after the succinate solution was added.
- The microplate was placed in a plate reader set at 37 oC and incubated for 5 min.
- Intensities were measured in a fluorescent plate reader every 10 min for 200 min (Ex: 500 nm, Em: 650 nm, Bottom reading).
- OCR values were calculated by entering the obtained intensity values into the dedicated Excel calculation sheet downloaded from the E297 product page.
 |
|
Figure 2 Changes in the OCR induced by succinate |
|
The addition of succinate increased the OCR of the fractionated mitochondria. |
Frequently Asked Questions / Reference


MT17: IntactMito Fractionation Kit for Tissue
Revised Nov., 25, 2025