 Hidden sections will not be printed.
General Information
Glutamate is not only used for biosynthesis of proteins and glutathione but also plays an important function as a neurotransmitter. Excess of glutamate is thought to contribute to neurodegenerative diseases such as Alzheimer’s disease. A recent study showed that inhibition of cystine/glutamate transporter (xCT), which takes in cystine and releases glutamate, induces ferroptosis, and current cancer research is exploring xCT as a target1), 2).
Glutamate Assay Kit-WST enables quantitation of glutamate as a metabolite. This kit has been optimized to quantify glutamate in cell culture supernatants as well as intracellular glutamate by measuring absorbance in a colorimetric WST reaction. This kit is formatted for 96-well microplates and the assay has a detection limit of 5 μmol/l glutamate.

Figure 1. Principle of Glutamate Assay Kit-WST
Kit Contents
| Dye Mixture | x 1 |
| Glutamate Standard (10 mmol/l) (Red cap) | 300 μl x 1 |
| Enzyme (Green cap) | x 1 |
| Reconstitution Buffer (White cap) | 750 μl x 1 |
| Assay Buffer | 7.5 ml x 1 |
| Lysis Buffer | 25 ml x 1 |
| Filtration Tube | x 24 |
- Use the filtration tube for quantifying intracellular glutamate. Twenty-four tubes correspond to 24 test samples. For additional samples, commercially available filtration tubes (e.g., Nanosep Centrifugal Devices (10K)([OD010C33], PALL)) are recommended.
Storage Conditions
Store at 0-5 °C
Required Equipment and Materials
- Microplate reader (450 nm filter)
- Incubator (37 °C)
- 100-1000 μl and 20-200 μl micropipettes
- Conical tube
- 96-well microplate
- 20-200 μl multichannel pipette
- Phosphate buffered saline (PBS)
Precautions
- Equilibrate reagents to room temperature prior to use.
- Centrifuge the tube with Enzyme (green cap) briefly before opening to remove all content from walls of the tube and inside the cap.
- Analyzing samples and standards in triplicate is recommended for accuracy.
- Use a multichannel pipette to dispense the working solution and minimize time lags in pipetting, because the enzymatic reaction is initiated immediately upon its addition.
- Prepare samples at different dilutions to determine the most suitable concentration, ranging from 0 to 0.5 mmol/l glutamate.
- Dye Mixture is stored in a glass bottle with an aluminum cap. Handle with caution and wear gloves.
- The kit has been designed for analyzing cell culture supernatants and intracellular glutamate. To measure intracellular glutamate, prepare cell lysates and glutamate standards in a Lysis Buffer. Use cell lysates deproteinized with the Filtration Tube.
Preparation of Solutions
Preparation of Dye Mixture stock solution
Add the entire volume of Reconstitution Buffer to the Dye Mixture vial and dissolve contents completely.
- Transfer the resulting Dye Mixture stock solution to the vial from the Reconstitution Buffer and store at 0-5 °C, protected from light.
The Dye Mixture stock solution is stable for 2 months under these conditions.
Preparation of Enzyme stock solution
Add 120 μl PBS to the Enzyme tube and dissolve by pipetting.
- Centrifuge the tube briefly each time before opening to remove all content from the tube wall or inside the cap.
- The Enzyme stock solution should be maintained in an ice bath during use.
- The Enzyme stock solution is stable for 2 months when stored at 0-5 °C.
Preparation of working solution
- Add the Dye Mixture stock solution to a conical tube and dilute with the Assay Buffer.
- Add the Enzyme stock solution to the solution prepared in the step 1 .
- Refer to Table 1.
- The working solution is light-sensitive. Prepare it immediately prior to use and protect it from light by covering the tube with aluminum foil. Prepare the working solution fresh each day and use immediately after preparation.
| for 24 well | for 48 well | for 96 well | |
| Dye Mixture stock solution | 175 μl | 350 μl | 700 μl |
| Assay Buffer | 1575 μl | 3150 μl | 6300 μl |
| Enzyme stock solution | 24.5 μl | 49 μl | 98 μl |
General Protocol
1. Sample preparation
- Sample preparation (supernatant) -
Dilute cell culture supernatants (test samples) as follows.
- Prepare samples at different dilutions to determine the most suitable concentration. Glutamate concentrations should range from 0 to 0.5 mmol/l. Use ddH2O for dilutions.
- Sample volume in the assay is 40 μl per well.
- Sample preparation (cell lysate) -
- Prepare a cell suspension (5-10×105 cells) in a 1.5 ml microtube.
- Centrifuge at 300 x g for 5 minutes and remove the supernatant.
- Add 500 μl PBS, suspend by pipetting, centrifuge at 300×g for 5 minutes and remove the supernatant.
- Add 300 μl Lysis Buffer, lyse the cells by pipetting and centrifuge at 12,000 x g for 5 minutes.
- Transfer 250 μl supernatant to a MWCO 10K filtration tube and centrifuge at 12,000 x g for 10 minutes.
- To analyze samples in triplicate, more than 120 μl sample is required (40 μl for triplicate reactions, 3×40 μl).
- Extend the centrifugation time if the filtrate volume is less than 120 μl.
- Use the sample solution from Step 5 (test samples) for measuring.
- Prepare samples at different dilutions to determine the most suitable concentration. Glutamate concentrations should range from 0 to 0.5 mmol/l. Use Lysis Buffer for dilutions.
2. Preparation of glutamate standard solution
Mix 50 μl Glutamate Standard (10 mmol/l) and 950 μl ddH2O in a microtube to prepare a 0.5 mmol/l glutamate standard solution. Serially dilute with ddH2O to prepare 0.5, 0.25, 0.125, 0.0625, 0.0313, 0.0157, 0.00785, and 0 mmol/l (Figure 2).
- To measure intracellular glutamate concentrations, use the Lysis Buffer to prepare glutamate standard solution instead of ddH2O.
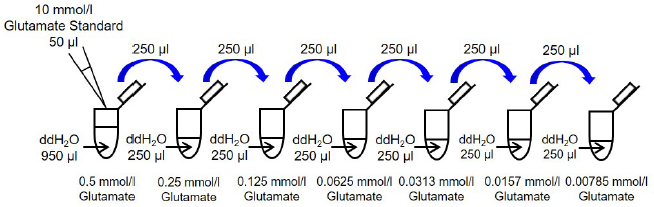
Figure 2. Preparation of glutamate standard solutions
3. Measurements
- Add 40 μl glutamate standard and test sample solutions to separate wells in a 96-well microplate (Figure 3).
- To obtain accurate data, triplicate samples are recommended.
- Add 60 μl working solution to each well.
- Because the enzymatic reaction starts immediately after working solution is added, use a multichannel pipette to minimize time lags in pipetting.
- Incubate the microplate at 37 °C for 30 minutes.
- Seal the microplate during incubation to prevent evaporation.
- Measure absorbance at 450 nm with a microplate reader.
- Calculate the glutamate concentration in each test sample from a calibration curve generated from the glutamate standards.
- Multiply the results by the dilution factor to determine glutamate concentrations in the original samples.
-
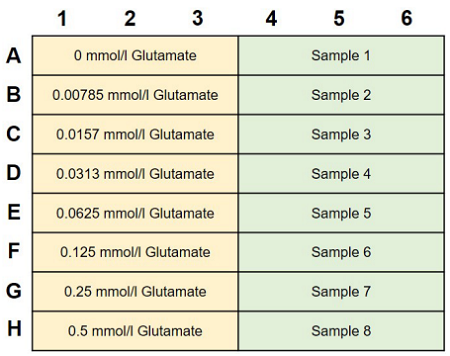
Figure 3. Example of an assay plate format (n=3)
-
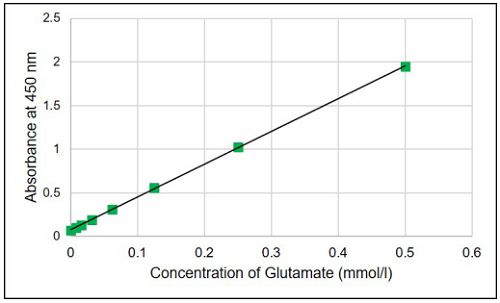
Figure 4. Typical calibration curve generated with glutamate standards
Experimental Example
Inhibition of cystine/glutamate antiporter with erastin treatment
- A549 cells were seeded in a 6-well plate (1×10⁶ cells/well in DMEM containing 10% fetal bovine serum and 1% penicillin-streptomycin) and cultured overnight at 37 °C in a 5% CO2 incubator.
- The medium was removed and 2 ml DMEM containing erastin was added to wells.
- The cells were cultured overnight at 37 °C in a 5% CO2 incubator.
- The supernatant (100 μl) was transferred to a 1.5 ml microtube and diluted 15-fold with ddH2O (sample solution).
Sample or glutamate standard solutions (40 μl each) were added to individual wells of a 96-well microplate. - The working solution (60 μl) was added to each well.
- The assay plate was incubated at 37 °C for 30 minutes.
- Absorbance at 450 nm was measured with a microplate reader and the concentrations of glutamate in the samples were calculated from the calibration curve.
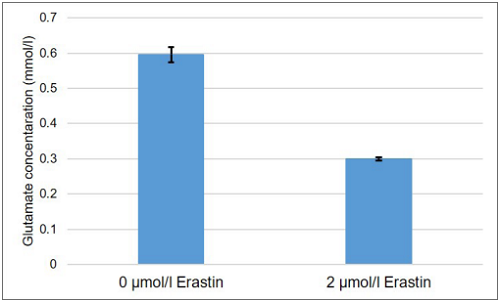
Figure 5. Comparison of glutamate concentration in supernatant from A549 cells treated with erastin and untreated
Cystine/glutamate antiporter inhibited A549 cells showed decreased glutamate release.
Reference
1) Cobler, L. et al., Oncotarget, 2018, 9, 32280-32297.
2) Tobias, M. et al., Free Radical Biology and Medicine, 2019, 133, 144-152.
Frequently Asked Questions / Reference


G269: Glutamate Assay Kit-WST
Revised May., 17, 2023