General Information
For the cellular senescence plate assay, normalization of the procedure can help researchers to obtain reliable results. This protocol describes combination of the “Cellular Senescence Plate Assay Kit - SPiDER-βGal” (code: SG05) and the “Cell Count Normalization Kit” (code: C544) into a 96-well microplate assay. Before conducting this procedure, please read the dedicated Technical Manual for each of the component products.
Products
Required Equipment and Materials
- Phosphate buffered saline (PBS)
- 96-well black microplate (clear bottom)
- Incubator (37 °C)
- Micropipette (100–1000 μl, 20–200 μl)
- Dimethylsulfoxide
- Conical tubes
- Fluorescent microplate reader
- Multi-channel pipette (20–200 μl)
Procedure Scheme


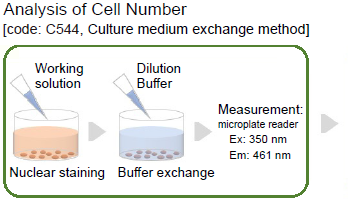
Analysis of Cell Number
The procedure for the Cell Count Normalization Kit
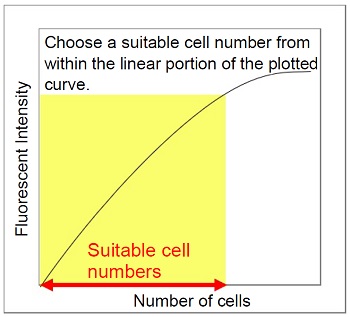
When using this kit for the first time, it is necessary to determine the suitable range of cell numbers to obtain reliable results. To achieve this, plot the fluorescent intensity (y-axis) of serially-diluted cells (x-axis) and confirm the range of suitable cell numbers as described below. After seeding the serially-diluted cells into a microplate, incubate the cells for a time period the same as the incubation period used when analyzing cellular senescence.
The approximate cell number should be: 1,000–30,000 cells/well (adherent cells), 5,000–60,000 cells/well (cells in suspension).
Serial Dilution ProcedureSerial Procedure
-
Using an 8-channel multi-pipette, add 100 μl of media to each well of a 96-well microplate. Next, add 100 μl of a solution containing 5 × 10⁵ cells/ml to the first well and pipette to mix. This well will contain the maximum number of cells. Next, take 100 μl from the first well and add it to the next well, and mix. This process is repeated as indicated in the figure. Finally, take 100 μl from the last well, which contains the minimum number of cells, and discard.
Confirmation of the range of suitable cell numbersConfirmation numbers
-
Plot the data on a graph, presenting the cell concentration on the x-axis and the fluorescent intensity on the y-axis. Then, the range of suitable cell numbers are indicated within the linear portion of the plotted curve.
Preparation of Solutions
Make a 500-fold dilution of Staining Solution with the Dilution Buffer.
- Use the Working solution within a day.
- When using a 96-well microplate, 100 μl/well of Working solution is needed.
Measurement
- Seed 100 μl of senescent cells*1 and control cells on a 96-well micro plate after suspended with medium, and incubate the cells at 37°C overnight in a 5% CO2 incubator.*2
- Add 100 μl of Working solution to each well.
- Incubate the cells at 37 °C for 30 minutes in a 5% CO2 incubator.
- Discard the supernatant*3 and add 100 μl of the Dilution Buffffer to each well.
- Measure flfluorescence using a microplate reader (Ex: 350 nm, Em: 461 nm).
- It is recommended that cellular senescence is induced in culture vessels. Please then transfer senescence cells and control cells to 96-well microplate for the assay.Please refer to FAQs our website. The experimental example of how doxorubicin treatment induced cellular senescence can be found in the technical manual of Cellular Senescence Plate Assay Kit - SPiDER-β Gal [code: SG05].
- The flfluorescent intensity of the blank control should be subtracted from that of the cell sample. Prepare a blank control sample by following the procedure above but adding only culture medium to the wells in step 1 rather than cells.
- If a suspension of cells is used, discard the supernatant after centrifugation.
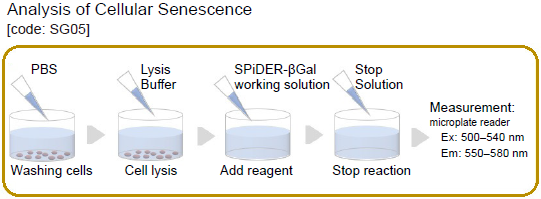
Analysis of Cellular Senescence
The procedure using the Cellular Senescence Plate Assay Kit - SPiDER-βGal
Preparation of Solutions
Preparation of SPiDER-βGal DMSO stock solution
Add 125 μl DMSO to the SPiDER-βGal tube and dissolve the contents using a vortex mixer.
Preparation of SPiDER–βGal working solution
Prepare a 10-fold dilution of the stock solution in the Assay Buffer.
- Prepare the working solution fresh each day.
- When using a 96-well plate, 50 μl of working solution is needed for each well.
Measurement
- Discard the supernatant from each well in the plate measured at step 5 in the previous experiment (Analysis of cell number).
- Wash the cells with 100 μl PBS.
- Add 50 μl Lysis Buffer to each well and incubate the plate at room temperature for 10 minutes.
- Add 50 μl SPiDER–βGal working solution to each well and incubate at 37 °C for 30 minutes.*1
- Add 100 μl Stop Solution to each well.*2
- 6. Measure the fluorescence using a microplate reader (Ex: 500–540 nm; Em: 550–580 nm).*3
- If there isn't any signal difference between control and senescent cells, please extend the incubation time (30 minutes to overnight).
- The addition of Stop Solution halts SA-β-gal activity. Therefore, a suitable incubation time at step 3 should be confirmed before the addition of Stop Solution.
- If there is no difference between senescent and control cell measurements, please note that there is leakage of excitation light.
Calculation of Senescent Cells
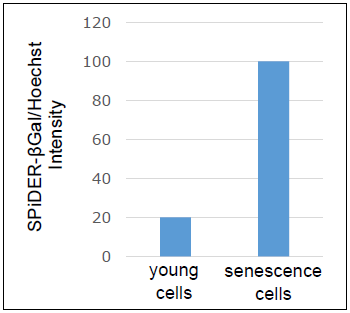
Determine the normalized SA-β-gal activity by dividing the result from the “Analysis of Cellular Senescence” by that from the “Analysis of Cell Number”.


Example of normalized SA-β-gal activitySA-activity
C544_SG05: Protocol for a Combined Analysis Cell Count Normalization Kit Cellular Senescence Plate Assay Kit - SPiDER-βGal
Revised Jun., 27, 2023


 Hidden sections will not be printed.
